Introduction
This book has as the main goal to serve as a catalog of the best practices and good examples of code to help us code better.
Best Practices for Writing Tests
Introduction
In this documentation, we'll talk about good habits for when you're coding a test.
Another good source to know the best practices is the Microsoft Documentation for writing Unit Tests. We can also use many of those tips when writing Integration Tests.
Example File
This issue is part of an idea to have a catalog of examples of good code. The example chosen in this case is the Commands Controller tests in Mobiltracker API.
Test Driven Development
We follow the Test Driven Development (TDD), a software development technique in which we write the test first, watch it as it breaks, and then implement the functions necessary to solve our problems. This way, we can help to avoid a false positive.
Another good practice is to begin by testing the errors we know are most likely to happen. Then, by leaving the successful test for last, we can be more confident that we have a code that is more robust and less susceptible to failure.
Naming and Organizing
When we're writing API Integration Tests, it's good to keep them organized so they'll be easier to maintain. A good way to do it is by having a folder called Controllers and dividing the tests for each controller in a different file. Such as this example:
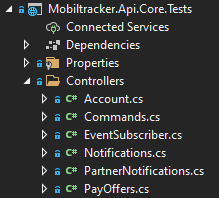
Inside the file, the namespace must be the name of the controller. And each of the possible routes should be divided into a different class.
namespace CommandsController
{
  public class GET_TrackerCommands
  {
    [...]
  }

  public class GET_CommandPatterns
  {
    [...]
  }

  public class POST_CommandRequest
  {
    [...]
  }
}
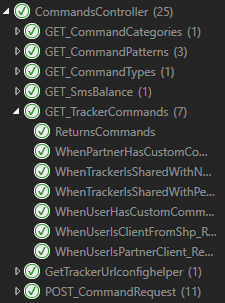
Now, the name of each test should make explicit what scenario we're testing. This way, we know what's supposed to happen. For example:
[Fact]
public async Task WhenTrackerIsSharedWithNoPermissionCommand_Returns404()
{
  [...]
}

[Fact]
public async Task WhenTrackerIsSharedWithPermissionCommand_ReturnsCommands()
{
  [...]
}
These naming suggestions come from the Microsoft Documentation linked earlier.
With all that, we'll have tests much more organized in the Test Explorer section of Visual Studio.
Scenario Builder
When we're creating a test, we should use a Scenario Builder to design an environment that will make it possible to see if everything is working properly.
It must have methods that help us personalize this environment, such as these examples:
var builder = new ScenarioBuilder()
    .AddUser(u => u.PartnerId = Guid.NewGuid())
    .AddTracker(t => { t.TrackerClassId = 1; })
    .AddAuthorization();
It'll be useful if many of these methods have as an optional parameter a function that lets us configure more specifically the things we'll need to test. It's important to always make the data explict.
[Fact]
public async Task WhenTrackerIsSharedWithNoPermissionCommand_Returns404()
{
    var builder = new ScenarioBuilder()
        .AddUser()
        .AddTracker(t => { t.TrackerClassId = 1; })
        .AddUser()
        .ShareLastTrackerWithUser(s => s.PermissionCommand = false)
        .AddAuthorization();

    [...]
}

[Fact]
public async Task WhenTrackerIsSharedWithPermissionCommand_ReturnsCommands()
{
    var builder = new ScenarioBuilder()
        .AddUser()
        .AddTracker(t => { t.TrackerClassId = 1; })
        .AddUser()
        .ShareLastTrackerWithUser(s => s.PermissionCommand = true)
        .AddAuthorization();

    [...]
}
Notice that in the method
ShareLastTrackerWithUser(), we're making explicit what we want to test: the PermissionCommand property.
The Test
For the testing, we use the testing tool xUnit, which provides us the Assert functions we use to verify the response of the API call we're testing.
public async Task WhenTrackerIsSharedWithNoPermissionCommand_Returns404()
{
    [...]

    using (var scenario = await builder.BuildAsync())
    {
        var response = await scenario.HttpClient
            .GetAsync($"trackers/{scenario.Tracker.TrackerId}/commands");

        Assert.Equal(404, (int)response.StatusCode);
    }
}
Notice that we built the scenario we designed earlier and used it to test.
In the case of this test, we expected it to return an error 404, so we used the Assert.Equal() to verify if we received exactly what we wanted.
Redux and Data Management
Introduction
The goal of this documentation is to help you understand how to handle database information on Front-End. We'll mainly talk about Redux, what it is, and good practices when using it.
To exemplify we'll use some aspects of the Admin VanEscola implementation.
Conceptual Basis
Imagine we have a set of data that is used in various parts of the application. We wouldn't want each page could modify this data arbitrarily because it could lead to hard-to-reproduce bugs.
That's why we use Redux. It is a library used to separate the data management logic from the screen logic. With it, to change something in our data, we need to dispatch an Action that will handle it and specify what happened.
We can think of Actions as a way to help us understand what's going on in the app. When something changes, we know why and where it changed.
Having our data as states and the actions to modify them, we also need a function called Reducer. It takes a state and an action as arguments and returns the next state of the application.
React-Redux
For compatibility reasons, we use in our projects the React-Redux library. It gives us useful hooks to get the data (useSelector) and dispatch actions (useDispatch). For more informations on the differences bewtween Redux and React-Redux you can read the documentation linked above.
The usage of these hooks and the actions and reducers will be more detailed in the following tutorial session.
Implementation Tutorial
As said before, we'll use the implementation in Admin VanEscola as an example. We start by coding the roducer.
Reducer
A reducer is a function that receives a state and an action and transforms it in another state. It has an initial state and uses the action type to decide what it needs to do.
The way we type the state helps us with the data management.
export type ParentsState =
  | { tag: "UNLOADED" }
  | { tag: "LOADING" }
  | { tag: "ERROR" }
  | {
      tag: "LOADED",
      parents: Parent[],
    };
The tags "UNLOADED", "LOADING" and "ERROR" can be easily treated in the component and we can be assured that the data we want is loaded and without errors.
Using this typing we have two different scenarios. One where the data isn't ready – either because it's loading or because an error occured with the get API request – and another where it is and can be modified.
In our reducer, we'll treat those scenarios in two separate switch. The initial state will be "UNLOADED". Then, after the GET API Request, it can result in an error or success. The state returned by the first switch wil make it clear.
export default function parents(
  state: ParentsState = initialState,
  action: ParentsAction
): ParentsState {
  if (state.tag !== "LOADED") {
    switch (action.type) {
      case "GET_PARENTS_LOADING":
        return { tag: "LOADING" };

      case "GET_PARENTS_ERROR":
        return { tag: "ERROR" };

      case "GET_PARENTS_OK":
        return { tag: "LOADED", parents: action.data };

      default:
        return state;
    }
  }

  [...]
The second switch can assume that the data is loaded and ready to be manipulated, so it has actions like PUT and DELETE. It returns the already loaded state, with the modifications made within the application.
  [...]

  switch (action.type) {
    case "PUT_PARENT":
      return {
        ...state,
        parents: state.parents
          .filter((p) => p.userId !== action.data.userId)
          .concat(action.data),
      };

    case "DELETE_PARENT":
      return {
        ...state,
        parents: state.parents.filter((p) => p.userId !== action.data),
      };

    default:
      return state;
  }
}
Notice that every reducer receives all of the page messages (
GET_SCHOOLS,PUT_STUDENTS, etc), these actions shouldn't modify the state of this reducer, so we need adefaultthat returns the current state.
Action
You can think of an action as an event that describes something that happens in our application. It always has a type property, which makes it clear what's going on, and it may have a data property.
We use them specially to enclose our API calls, and we define a type that has each of our routes or events.
export type ParentsAction =
  | { type: "GET_PARENTS_ERROR" }
  | { type: "GET_PARENTS_LOADING" }
  | { type: "GET_PARENTS_OK", data: Parent[] }
  | { type: "PUT_PARENT", data: Parent }
  | { type: "DELETE_PARENT", data: string };
Notice that the type makes explict what is happening in the application.
We then define functions that will make the api requests and dispatch one of the action types. The dispatch is used to trigger the reducer.
The get something action is one of the most common, it is used to request the data from the API. When it starts, it makes a dispatch to modify the state to "LOADING". After the request is finished, it makes another dispatch that will depend if everything went right.
export function getParentsAction(): ThunkAction<Promise<void>> {
  return async (dispatch) => {
    dispatch({ type: "GET_PARENTS_LOADING" });
    try {
      const response = await apiRequest<any[]>({ url: "owner/parents" });
      const data = normalizeParents(response.data);
      dispatch({ type: "GET_PARENTS_OK", data: data });
    } catch {
      dispatch({ type: "GET_PARENTS_ERROR" });
    }
  };
}
We use ThunkAction as a way to turn dispatch into an async function.
We also have the actions that deal with PUT, POST and DELETE API Requests. It is similar to the GET action because it also waits for an API request and then makes a dispatch.
The main differences are: it will modify something in the data that is already loaded, so we don't have to dispatch the loading; and it usually has a return that indicates if it was succesful or not. This way the components can deal with errors.
export function putParentAction(
  name: string,
  phoneNumber: string,
  parentId: string
): ThunkAction<Promise<Result>> {
  return async (dispatch, getState) => {
    const parentsState = getState().parents;

    if (parentsState.tag !== "LOADED") return err({});

    const editedParent = parentsState.parents.find(
      (p) => p.userId === parentId
    );

    if (!editedParent) return err({});

    editedParent.name = name;
    editedParent.phoneNumber = phoneNumber;

    try {
      await apiRequest({
        url: `owner/parent/${parentId}`,
        method: "PUT",
        data: {
          name,
          phoneNumber,
        },
      });

      dispatch({ type: "PUT_PARENT", data: editedParent });

      return ok({});
    } catch {
      return err({});
    }
  };
}
Notice that with
ThunkActionwe can usegetState()to access the current state.
Store
The store is the combined state of all reducers and we use the useSelector() hook to access the specific state that we need.
const studentsState = useSelector(selectStudentsState);
const parentsState = useSelector(selectParentsState);
const schoolsState = useSelector(selectSchools);
selectParentsState() is a simple function to return the state from the store.
export const selectParentsState = (store: StoreState) => store.parents;
Since we have the tags in the state, after getting it with the useSelector(), it`s easy to treat loading states and error states.
The store is configured in the configureStore.ts file. and then we can go to index.tsx and have the Provider as the outermost component. This way the store is accessable in the entire application.
ReactDOM.render(
  <Provider store={store}>
    <PersistGate loading={null} persistor={persistor}>
      <App />
    </PersistGate>
  </Provider>,
  document.getElementById("root")
);
Implementing it in the page
If everything is configured appropriately, using the data in a screen or component should be easy. We only have to follow a few steps. Notice that the following component is a simplified version to ilustrate.
First, we use the useSelector() hook to get the current state of the data we need.
export function ParentsScreen() {
  const parentsState = useSelector(selectParentsState);
  const studentsState = useSelector(selectStudentsState)

  [...]
Then, we must verify if the state is in loading or in error and treat it accordingly.
Sometimes we need to access more than a single state and the validations must be done to each one of them.
  [...]

  if (isParentsLoading(parentsState) || isStudentsLoading(studentsState))
    return <div className="alert alert-info">Carregando...</div>;

  if (
    parentsState.tag === "ERROR" ||
    studentsState.tag === "ERROR"
  )
    return (
      <div className="alert alert-info">
        Ocorreu um erro, por favor tente novamente mais tarde.
      </div>
    );

  [...]
After that, we can be assured that the data is loaded and without errors and start using it.
  [...]

  const students = studentsState.students;
  const parents = parentsState.parents;

  return (
    <div>
      <ParentComponent parents={parents} students={students}></ParentComponent>
    </div>
  );
}
The useDispatch() hook is used to call an action, for example in the onClick of the save button of a form.
const dispatch = useDispatch()

[...]

<button
  onClick={async () => {
    const resp = await dispatch(
      putParentAction(currentName, currentPhone, myself.userId)
    );
    setSuccess(resp.success ? "success" : "error");
  }}
>
  Salvar
</button>
The return of the action is used to verify if everything went right or not and treat it properly.
Data Fetching and Cache Maintenance
Ainda não temos um exemplo de boa implementação de "data fetching and cache maintenance", mas para fins didáticos o admin VanEscola funciona da seguinte maneira:
We don't have an example of good implementation for data fetching and cache maintenance. But, for didactic purposes, this is how we do it in VanEscola Admin: when the user logs in, everything is loaded.
function Main() {
  const isAuthenticated = useSelector<StoreState, unknown>(
    (s) => s.login.authenticated
  );
  const dispatch = useDispatch();

  useEffect(() => {
    if (isAuthenticated) {
      dispatch(getStudentsAction());
      dispatch(getSchoolsAction());
      dispatch(getParentsAction());
      dispatch(getProfileAction());
    }
  }, [isAuthenticated, dispatch]);

  [...]
}
We also have a throttle to avoid receiving too many requests at the same time.
export function refreshStateAction(): ThunkAction<Promise<void>> {
  const time = Date.now();
  const diff = time - lastTime;

  if (diff < throttleTimeout) {
    return () => Promise.resolve();
  } else {
    lastTime = time;
    return async (dispatch) => {
      dispatch(getParentsAction());
      dispatch(getStudentsAction());
      dispatch(getSchoolsAction());
    };
  }
}
Usually, when we make a post, put or delete request, we also call a get in order to update the data in the state. But sometimes we can update manually in the reducer.
Repositories
Introduction
The goal of this documentation is to help you create and manage our git repositories.
This page is still a work in progress. We can list the missing topics here:
naming- monorepo vs multi-repo
Repository naming
The preferred format is [domain/sytem]-[type]-[complement, optional].
Examples:
- mobiltracker-app-monitor:
[mobiltracker]-[app]-[monitor] - vanescola-app-pais: :
[vanescola]-[app]-[pais] - vanescola-api:
[vanescola]-[api]-[](no complement) - vanescola-registration-form:
[vanescola]-[registration-form]-[](no complement)
Responsive tables
TODO: examples
See: https://medium.com/appnroll-publication/5-practical-solutions-to-make-responsive-data-tables-ff031c48b122
Types of reponsive tables
Shorten : remove unnecessary columns and keep the table concise by leaving the crucial data only
Moveable : use swipe gestures to scroll through the whole table horizontally
Collapsed : columns are navigated using swipe gestures, the primary column (legend) is fixed.
Transformed : collapse table rows into separate cards.
Guidelines
We are only using Shorten and Moveable types, because they are easy to develop.
Apply the following decisions from top to bottom:
- Use a 3 column "shorten" table, unless it not possible.
- Use "moveable"
Utils
Introduction
The goal of this documentation is to set a standard for utils in our projects.
Where to find them
utils must be located inside a folder called src/utils. See an example.
Common Utils
Phone number formatter
const formatPhoneNumber = (input: string) => {
  let cleaned = input.replace(/\D/g, "");
  let match = cleaned.match(/^(\d{2})(\d{5})(\d{4})$/);

  if (match) {
    return "(" + match[1] + ") " + match[2] + "-" + match[3];
  } else {
    return cleaned;
  }
};
CPF-CPNJ formatter
const formatCpfCnpj = (input: string) => {
  let cleaned = input.replace(/\D/g, "");
  let cpfMatch = cleaned.match(/^(\d{3})(\d{3})(\d{3})(\d{2})$/);
  let cnpjMatch = cleaned.match(/^(\d{2})(\d{3})(\d{3})(\d{4})(\d{2})$/);

  if (cpfMatch) {
    return `${cpfMatch[1]}.${cpfMatch[2]}.${cpfMatch[3]}-${cpfMatch[4]}`;
  } else if (cnpjMatch) {
    return `${cnpjMatch[1]}.${cnpjMatch[2]}.${cnpjMatch[3]}/${cnpjMatch[4]}-${cnpjMatch[5]}`;
  } else {
    return cleaned;
  }
};
Email Validator
function validateEmail(value: string) {
  return /^[a-zA-Z0-9.+_-]+@[a-zA-Z0-9-]+(?:\.[a-zA-Z0-9-]+)+$/.test(value);
};
How to rename a SQL Table
Most table migrations will affect a lot of different proccesses and can cause irreversible damages. So, before starting any migration, make sure that the whole team is aware of the changes and make sure that they are worth it.
We have different migration strategies depending on the characteristics of the table. Take the following quiz to find the one that best suit your needs.
Does the table have only one or very few updating processes?
NO: Next question.
YES: Use the View Strategy
The idea behind this strategy is to replace the current table with a view of the new one and then quickly point the updating process to the new table. This change wont break the reading processes because they'll read from the view and so you can migrate them at your own pace.
How to do it:
- Create new table
- [Quickly] Delete old table, create view pointing to the new table with the name of the old table and migrate the updating process to the new table
- Migrate the read processes to the new table
- Make sure the view is not being used anymore
- Delete old table
Is the table huge?
YES: Next question
NO: Use the Duplication Strategy
The idea behind this strategy is to duplicate the old table to the new one and keep it updated so that you can migrate it at your own pace. This strategy is ideal for tables that are accessed and updated by multiple processes, but it takes a lot of space due to the duplication, so it is not recommended for tables with too much data.
We have a issue template with a step-by-step tutorial on the mobiltracker-data repository. Create a issue from this template to follow this tutorial and to bring visibility to this migration.
Click here to see the template.
???
Conditional Types - Typescript
Problem
Given a type like the one below:
type Parent = {
  option: "A" | "B";
  children: { subOption: { a: true } | { b: true } };
};
It's not possible to guarantee that children will have the correct subOption.
const foobar: Parent = {
  // this is ok
  option: "A",
  children: { subOption: { a: true } },
};

const foobar2: Parent = {
  // this is wrong, but the compiler cannot ensure the correct type
  option: "A",
  children: { subOption: { b: true } },
};
How to fix this
To guarantee that children will have the correct type use conditional types. So, the compiler is able to infer the correct type.
type Parent<Option extends "A" | "B"> = {
  option: Option;
  children: {
    subOption: Option extends "A"
      ? { a: true }
      : Option extends "B"
      ? { b: true }
      : never;
  };
};

const foobar: Parent<"A"> = {
  option: "A",
  children: { subOption: { a: true } },
};

const foobar2: Parent<"A"> = {
  option: "A",
  // @ts-expect-error
  children: { subOption: { b: true } },
Example
Using conditional type we can set the properties of a column by the table's responsive type. Like this:
type ResponsiveType = "shorten" | "movable";

type ResponsiveTypePropsForShorten = { visible: boolean };
type ResponsiveTypePropsForMovable = { move: boolean };

type ResponsiveTypeProps<R extends ResponsiveType> = R extends "shorten"
  ? ResponsiveTypePropsForShorten
  : R extends "movable"
  ? ResponsiveTypePropsForMovable
  : never;

type Table<R extends ResponsiveType> = {
  responsiveType: R;
  columns: Column<R>[];
};

type Column<R extends ResponsiveType> = {
  responsiveTypeProps: ResponsiveTypeProps<R>;
};

const table1: Table<"shorten"> = {
  responsiveType: "shorten",
  columns: [{ responsiveTypeProps: { visible: true } }],
};

const table2: Table<"movable"> = {
  responsiveType: "movable",
  columns: [{ responsiveTypeProps: { move: false } }],
};
If you want to see the full version of the example above click here
[DRAFT] VanEscola ScenarioBuilder History
This article is under construction!
TO DO:
- Add code examples
- Write a second draft
How did we end up with the VanEscola Scenario Builder.
Test implementation
Let's create a basic test from scratch on C#.
We use a library called Xunit. It allow us to run tests and assert values.
Run this basic test on Visual Studio.
using Xunit;

namespace Test
{
    public class TestClass
    {
        [Fact]
        public void TestA()
        {
            Assert.Equal(2, 1 + 1);
        }
    }
}
Problem 1: We need tests!
Let's model a fictional integration test.
[Fact]
public void BasicIntegrationTest() {
    // First, we need to connect to the database
    var database = connectToDatabase();

    // Then, we clean the database so that the last test data doesnt interfere this one
    database.cleanDatabase();

    // Then we fill the database with the data we need for this test
    var user = new User() { };
    database.Users.add(user);

    var pet = new Pet() { owner = user };
    database.Pets.add(pet);

    // We start our API
    var API = initializeApi();
    createMockApi();

    // apply test actions
    ...

    // validate result
    ...
}
Code smell 1: Duplication of test initialization
After a few tests, most of this code will be duplicated.
We then extracted all the repeating code to a class named Scenario that will represent each test environment.
Code smell 2: Duplication of scenario setup
There is still have a lot of duplication because the test setups will always be slightly different for each test.
Lets create a ScenarioBuilder to facilitate the setup of different Scenarios. Then, let's extract each of our functions to a reusable build step of our builder.
Code smell 3: Same build steps always appearing together
Note that the "AddLogin" and "AddTokenToClient" always appear together, this points to a bad separation of build steps. What we actually want is to represent the funcionality of "AddUserAuthorization" to use the UserToken in the HttpClient to simulate a loggedIn User. In the same way, we dont want to create a Membership separately from an User because we'll always need both.
Code smell 4: Multiple implementations of AddUser
Instead of multiple implementations for each user, we can just parameterize our AddUser function for much more flexibility.
Code smell 5: Passing the same parameters on most AddUser functions
Most of our AddUser functions will always take the same name and most of the time, we dont even care what the user is called, so lets just transform the "name" argument into an optional parameter. This way, we dont have to pass the same name everytime.
Code smell 6: Too many arguments on a build step
Everytime we needed an entity with a specific value, we parameterized it's creation function. Eventually, our build step will look like this.
Most of the tests that call this function dont need any specific value, but there are a few that need their values to be some exact value.
Let's replace all the step parameters with a single optional setup function. This way, the tests that need a complete setup can make all this changes through a single parameter.
Code smell 7: Same parameters appearing in multiples tests
Why?
Some entities have properties that should be unique to each one, for example, the phonenumber of an user. When creating a scenario for a test that needs two users, we have to manually set at least one of the phonenumbers to avoid two users with the same one. And then, even though we dont need any specific value for a phonenumber, we have to set this manually everytime we have at least two users
How to fix it?
Instead of using the same default phonenumber for each user, we can generate a random phonenumber everytime the AddUser function is called. This way, we can generate multiples users without having to manually setup their phonenumbers to avoid collision.
We use a library called Bogus that have multiple options for randomly generating different data sets like phonenumber, street address, names, etc.
Problem 2: The Rise of the Heisenbugs
What?
Some tests failing only sometimes.
Why?
Due to our randomly generated values, sometimes a generated value breaks our test either because it is invalid or our code is broken, but then running it again generates a different value that works.
How to fix it?
The Bogus library allows us to set a fixed seed. This way, even though the values used are different between each other, they will always be the same ones between runs.
Code smell 8: Bogus constructor sucks
Why?
The expected Bogus use is to create a different builder for each entity. This sucks because most of the time, all we want is a single simple entity and dont want to create a whole builder for it.
How to fix it?
Bogus allow us to create a function that creates a randomized value. This allow for much simpler and flexible usages of the Bogus library.
Code smell 9: Setting up entity relationships appearing a lot of times
Why?
A lot of entities have no meaning by themselves or need another entity to exist, for example Membership and User. There is no Membership without an User. And so, everytime we create a Membership, we have to create a relationship between them.
How to fix it?
If the entity being created needs another entity to exist, let's expect for it to already be created and automatically relate the created entity to this one.
Problem 3: Entity expected for relationship doesnt exist
Why?
Eventually, we'll forget the entities that another entity will need and addMembership without having called a addUser first. This will break the test saying something along the lines of "No User found" and it might take us a few annoying minutes of debugging before realizing our small mistake.
How to fix it?
Assert that everything that your entity needs to be created is ready, and if not, throw a more descriptive error. For example, when using a addMembership without calling an addUser first can result in a "Could not create Membership. No User was found. Make sure to call addUser() BEFORE calling the addMembership() function". This will save you a lot of time and stress.
Proposta de boas práticas de rotas e controllers
Rotas atuais
Lista atual de rotas e controllers do VanEscola
VansController
- GET Parents/Vans
- policy: parent
- return vans w/ studentIds
VanOwnerController
- GET parent/vanowner
- policy: parent
- return vanowner data (business name, userid and phonenumber)
VanController
- POST van/locations-rnbg
- policy: driver
- send locations to mobiltracker
- POST van/mtk-endpoint
- policy: público
- receive locations from mobiltracker
- GET van
- policy: driver
- vanId e nome da van do motorista
- DELETE van/current-route
- policy: driver
- deleta current-route
- POST van/current-route
- policy: driver
- cria current-route
UserController
- GET user =>
- legacy
- policy: Driver
- returns user
- talvez não seja mais usado
- GET driver/user
- policy: Driver
- retorna userId, email e username do motorista
- GET parent/user
- policy: Parent
- retorna nome e phonenumber do pai
- GET owner/user
- policy: Owner
- retorna userId, nome, phone e businessName do owner
- PUT owner/user
- policy: Owner
- atualiza nome e businessName
- POST registration
- policy: público
- cadastra Owner
- PUT activation
- policy: público
- ativa owner
- PUT recover-password
- policy: público
- manda e-mail de recuperação de senha
- PUT reset-password
- policy: público
- reseta a senha do usuário
- PUT change-password
- policy: owner
- muda a senha do owner
- PUT resend/registration
- policy: público
- reenvia e-mail de ativação de conta
StudentsController
- GET students
- legacy
- policy: Driver
- redirect para get students as driver
- GET owner/students
- policy: Owner
- get students of owner
- GET driver/students
- policy: Driver
- get students of driver
- GET parent/students
- policy: Parent
- get students of parent
- POST owner/student
- policy: Owner
- create student
- PUT owner/student/{id}
- policy: Owner
- update student name, school and isActive
- POST owner/parents/{parentId}/students/{studentId}
- policy: Owner
- create parent-student relationship
- DELETE owner/parents/{parentId}/students/{studentId}
- policy: Owner
- delete parent-student relationship
- DELETE owner/student/{studentId}
- policy: Owner
- delete student
SchoolsController
- GET schools
- policy: Driver
- legacy redirect to get school as driver
- GET driver/schools
- policy: Driver
- get schools from the driver's owner
- GET owner/schools
- policy: Owner
- get schools from owner
- POST owner/schools
- policy: Owner
- create school
- PUT owner/schools/{schoolId}
- policy: Owner
- update school
- DELETE owner/schools/{schoolId}/delete
- policy: Owner
- delete school
- GET parent/schools
- policy: Authorize
- get schools from parent students
RoutesController
- GET routes
- policy: Driver
- retorna todos templates de rotas daquela vanId
- POST routes
- policy: Driver
- cria template de rota
- PUT routes/{routeId}
- policy: Driver
- atualiza rota
- DELETE routes/{routeId}
- policy: Driver
- deleta rota
- POST routes/{routeId}/events
- policy: Driver
- cria evento de rota
- PUT {routeId}/route-students ou {routeId}/route-items
- policy: Driver
- adiciona item a rota
- GET owner/routes
- policy: Owner
- retorna rota de todas vans
ReportsController
- GET reports
- policy: Driver
- retorna resumo de atividades de responsáveis
ParentsController
- GET owner/parents
- policy: Owner
- retorna parents do owner
- POST owner/parent
- policy: Owner
- cria parent
- PUT owner/parent/{id}
- policy: Owner
- atualiza parent
- DELETE owner/parent/{parentId}
- policy: Owner
- deleta parent
NotificationController
- GET notifications/messages
- policy: Parent
- retorna todas as notificações de um pai
- PUT notifications/seen
- policy: Parent
- atualiza todas notificações para vistas
DriversController
- GET Owner/Drivers
- policy: Owner
- retorna os drivers do owner
- GET Parent/Drivers
- policy: Parent
- retorna os drivers do parent
AuthController
- POST auth/token
- policy: Público
- loga o usuário
- DELETE auth/ticket
- policy: Authorize
- deleta login
- POST auth/ticket
- policy: Público
- loga com authticket
- POST password
- policy: Driver
- muda password do driver
- PUT auth/registration-id
- policy: Authorize
- altera registrationId do usuário
Padronização
Vocabulário
Entidade
Objeto do banco de dados, parcialmente equivalente ao que seria uma linha da tabela.
Exemplos:
- Tracker
- User
- Alert
Propriedade
Atributo de um objeto do banco de dados, equivalente ao que seria uma coluna de uma linha da tabela, podendo também ser uma relação com outra entidade.
Exemplos:
- IsActive (do Tracker)
- IsOnline (do Tracker)
- Seen (do Notification)
Controller
Um controller deve ser responsável por uma única entidade. Toda atualização e leitura dessa entidade deve estar nesse controller.
Nomenclatura
Nome do controller: [Entitades]Controller (sempre no plural)
Exemplos:
- VansController
- StudentsController
- SchoolsController
- RoutesController
- ParentsController
- ReportsController
- DriversController
Modificações:
- VanOwnerController => OwnersController
- VanController => VansController
- UserController => UsersController
- criação do RouteEventsController (para rota de Post route/{id}/events que está no RoutesController)
- criação do CurrentRouteController (para rota de POST e DELETE van/current-route)
- NotificationController => NotificationsController
Exceções / o que fazer?
- AuthController
- Não existe um conceito de "Auths" no banco de dados, é uma aglomeração de diferentes formas de login e autorização de aplicativos
Implementação
O controller deve se encontrar em: controllers/[entidades]/[entidades]Controller.cs
É importante que ele seja implementado como uma partial class para que cada rota seja implementada como uma extensão do controller em um arquivo próprio.
// Exemplo para um EntitiesController.cs no projeto VanEscola.Api
using Microsoft.AspNetCore.Mvc;
using VanEscola.Models;


namespace VanEscola.Api.Controllers
{
    public partial class EntitiesController : Controller
    {
        public EntitiesController(AppDbContext dbContext)
        {
            this.DbContext = dbContext;
        }

        public AppDbContext DbContext { get; private set; }
    }
}
Rotas
Estrutura de pastas
Cada rota deve ser um arquivo cujo nome reflete sua rota e método e deve se encontrar na pasta do seu controller.
 |
|---|
| Exemplo de projeto nessa estrutura de pastas |
Perfis
No caso da API VanEscola, existem diferentes perfis de usuários que chamarão cada rota. Se a rota for um limitada para um perfil específico, o perfil deve prefixar a rota.
Exemplo:
- GET driver/user
- GET parent/user
- GET owner/user
- POST registration (pública)
Modificações:
- GET parents/vans => GET parent/vans
- GET van => GET driver/van
- POST/DELETE van/current-route => POST/DELETE driver/current-route
- Remover GET User (já existe GET driver/user)
- PUT change-password => PUT owner/change-password
- Remover GET Students (já existe GET driver/students)
- Remover GET Schools (já existe GET driver/schools)
- GET/POST/PUT/DELETE routes => GET/POST/PUT/DELETE driver/routes
- POST routes/{routeId}/events => POST driver/route-event
- PUT {routeId}/route-students ou PUT {routeId}/route-items => PUT driver/route/{routeId}/items
- GET reports => GET driver/reports
- GET notifications/messages => GET parent/notifications
- PUT notifications/seen => PUT parent/notifications/seen
- POST password => POST driver/change-password
Exceções / o que fazer?:
- POST van/locations-rnbg (chamada apenas por driver)
Padrões comuns de rotas
GET [Entidades]
Retorna uma lista com os dados de todas as entidades.
Exemplos:
- GET driver/students
- GET parent/students
- GET driver/schools
- GET owner/parents
- GET notifications/messages
GET [Entidade]
Retorna a única entidade relacionada ao usuário que a chamou.
Exemplos:
- GET van
- GET parent/user
- GET owner/user
- GET driver/user
POST [Entidade]
Cria uma entidade.
Exemplos:
- POST van/current-route
- POST owner/student
- POST owner/parent
Modificações:
- POST owner/schools => POST owner/school
- POST routes => POST route
DELETE [Entidade]
Deleta entidade do usuário (quando existe apenas uma entidade do usuário).
Exemplos:
- DELETE van/current-route
- DELETE auth/ticket
DELETE [Entidade]/{entidade-id}
Deleta entidade com entidade-id (quando podem existir múltiplas entidades de um mesmo usuário).
Exemplos:
- DELETE owner/student/{studentId}
- DELETE owner/parent/{parentId}
Modificações:
- DELETE owner/schools/{schoolId}/delete => DELETE owner/schools/{schoolId}
- DELETE routes/{routeId} => DELETE route/{routeId}
PUT [Entidade]
Atualiza dados da entidade do usuário (quando existe apenas uma entidade do usuário).
Exemplos:
- PUT owner/user
PUT [Entidade]/{entidade-id}
Atualiza os dados de uma entidade com entidade-id (quando podem existir múltiplas entidades de um mesmo usuário).
Exemplos:
- PUT owner/student/{student-id}
- PUT owner/parent/{parentId}
Modificações:
- PUT owner/user => PUT owner/user/{user-id}
- PUT owner/schools/{schoolId} => PUT owner/school/{schoolId}
- PUT routes/{routeId} => PUT route/{routeId}
PUT [Entidade]/{entidadeId}/[Propriedade]
Atualiza uma propriedade da entidade.
Exemplo:
- [NENHUM]
Modificações:
- PUT {routeId}/route-students => route/{routeId}/students
- POST/DELETE owner/parents/{parentId}/students/{studentId} => PUT owner/parents/{parentId}/students
PUT [Entidades]/[Propriedade]
Atualiza uma propriedade de várias entidades.
Exemplo:
- PUT notifications/seen
Apple Store iOS apps development
Glossário
Certificate
certificado que assina os apps
Provisioning profile
- arquivo de metadados que acompanham a assinatura do app, dentro do ipa (executável/pacote de app do ios)
- tem informações tipo:
- se é release, ou debug.
- se pode instalar direto em algum iphone.
- 'permissões' do app, ex: push notifications